About the author
Chris Griffith has been a game developer for over 19 years and a mobile developer since 2010. He’s produced dozens of apps and games for brands like Match.com, LEGO, Microsoft, Kraft, Anheuser-Busch and PepsiCo.
Chris has been a member of the PullRequest network since April 2018.
Be sure to check out other great work from Chris:
- The Most Common Issues I’ve Caught Reviewing iOS Apps
- Versioning for iOS and Android Apps - Part 1
- Versioning for iOS and Android Apps - Part 2
- The Most Common Issues I’ve Caught Reviewing Swift
- Top 3 Security Vulnerabilities I Find in iOS and Android Projects
- Tips for Screening Developers for a Remote Position

“Wait…”, you may be thinking. “Firebase is one of the easiest SDKs in the mobile ecosystem to set up. It’s got a great getting started guide that’s only five easy steps. Why in the world would you need to explain further something so well-documented?”
Well, astute reader, I agree with the sentiment. Firebase does feature one of the most straightforward setups in the industry if you follow stock installation in the documentation. For many working on simpler apps, this caveat is no big deal, and they need to read no further. However, anyone who has worked on a relatively complicated mobile app with lots of 3rd-party tools or multiple build configurations will tell you that getting set up with Firebase suddenly becomes less straightforward.
This is because for Firebase to do its job effectively with simple out-of-the-box integration, it needs to
essentially hijack your project. I don’t believe that’s too strong a term to use. It has to make definite
assumptions about how your application is set up in favor of allowing developers to simply call FirebaseApp .configure(). If you’ve ever integrated any other standard analytics, ad, or other 3rd-party tool SDKs, you may note
that you’re usually required to pass an API key, account ID, or some other data to initialize it. The ease with
which you can make this single call with no arguments has hidden costs that every developer should be aware of.
Configuration
When you first set up your Firebase app, you’re provided with a file called GoogleService-Info.plist and instructions to add it to your project and build target(s). This file contains all the information you would typically pass in an initializer call. This is a pretty efficient way of storing a lot of information needed to properly set everything up. It’s also where we start to see how you can make a single method call to kick off the process. Calling configure() with no arguments directs the SDK to load the plist file from the main bundle. You can’t rename the file or have multiple copies of it. If you need to for some reason, you’d be required to call a variation of that method that accepts a FirebaseOptions object. Now the code to load the configuration looks a bit more complex:
if let filePath = Bundle.main.path(forResource: "CustomName", ofType: "plist"),
   let options = FirebaseOptions(withContentsOfFile: filePath) {
    FirebaseApp.configure(options: options)
}
Suddenly you’re dealing with optionals that need to be unwrapped, and things become less elegant.
To add a layer of complexity, if your app needs to communicate with a server (which it likely does) you’ll probably have multiple backend environments and build configurations to support (dev, staging, production, etc.). And as you probably know, intermixing test environment analytics with production will pollute data and needs to be avoided. With the method above, you could simply load a different file based on which environment the app uses. However, now you’re including multiple plist files in your app (which can be extracted by a savvy user) with information about your development environments you might not want out for public consumption. You also turn the code above into a convoluted nest of conditionals to properly load the configuration.
A Better Way
The good news is that you can still retain that beautiful FirebaseApp.configure() call while retaining the benefit of multiple configuration file support. It involves creating a build script that will copy the correct file into the app’s bundle during compilation. Simply keep your configuration files with their original name, sorted into folders. You can have as many as you need.
Import the configuration files into the project (be sure not to make them part of any target), and sort them into
folders, similar to this: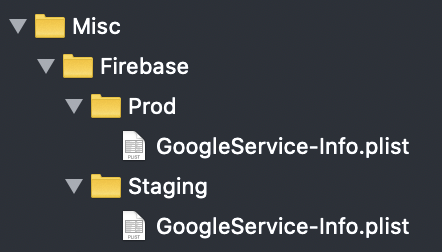
These files won’t be included in the build until a script runs. With your project target selected in Xcode, go to the
Build Phases tab. Hit the + button and create a new Run Script phase: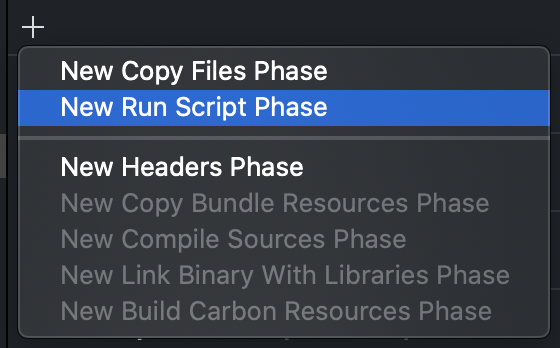
The following script should be pretty flexible to use across multiple projects by using lots of environment variables to know where files are. It also performs several checks to ensure the referenced files exist which aren’t absolutely necessary but a good idea to have so you can be alerted of problems when building your project.
# Name of the resource we're selectively copying
GOOGLESERVICE_INFO_PLIST=GoogleService-Info.plist

# Get references to dev and prod versions of the GoogleService-Info.plist
# NOTE: These should only live on the file system and should NOT be part of the target (since we'll be adding them to the target manually)
GOOGLESERVICE_INFO_STG=${PROJECT_DIR}/${TARGET_NAME}/Misc/Firebase/Staging/${GOOGLESERVICE_INFO_PLIST}
GOOGLESERVICE_INFO_PROD=${PROJECT_DIR}/${TARGET_NAME}/Misc/Firebase/Prod/${GOOGLESERVICE_INFO_PLIST}

# Make sure the dev version of GoogleService-Info.plist exists
echo "Looking for ${GOOGLESERVICE_INFO_PLIST} in ${GOOGLESERVICE_INFO_STG}"
if [ ! -f $GOOGLESERVICE_INFO_STG ]
then
    echo "No Development GoogleService-Info.plist found. Please ensure it's in the proper directory."
    exit 1
fi

# Make sure the prod version of GoogleService-Info.plist exists
echo "Looking for ${GOOGLESERVICE_INFO_PLIST} in ${GOOGLESERVICE_INFO_PROD}"
if [ ! -f $GOOGLESERVICE_INFO_PROD ]
then
    echo "No Production GoogleService-Info.plist found. Please ensure it's in the proper directory."
    exit 1
fi

# Get a reference to the destination location for the GoogleService-Info.plist
PLIST_DESTINATION=${BUILT_PRODUCTS_DIR}/${PRODUCT_NAME}.app
echo "Will copy ${GOOGLESERVICE_INFO_PLIST} to final destination: ${PLIST_DESTINATION}"

# Copy over the prod GoogleService-Info.plist for Release builds
if [ "${CONFIGURATION}" == "Production" ]
then
    echo "Using ${GOOGLESERVICE_INFO_PROD}"
    cp "${GOOGLESERVICE_INFO_PROD}" "${PLIST_DESTINATION}"
else
    echo "Using ${GOOGLESERVICE_INFO_STG}"
    cp "${GOOGLESERVICE_INFO_STG}" "${PLIST_DESTINATION}"
fi
This script could be modified in many ways. You could have all the configurations in a single folder with different names and rename them when copying. You could also key off the build configuration name to do concatenation and streamline the code. I wrote the example above to be extra explicit about what’s happening, with echo statements that can be read at build time. Now you have a solution that will allow you to use the single call for however many different configurations the iOS app requires.
Push Notifications
If you’re using Firebase in the first place, you’re likely tracking more than just basic-level analytics. You may be using the free push notifications feature (or Cloud Messaging, as they call it) to provide consistency with an Android app and ease communication between your server and Firebase. Google provides great documentation for this process and is actually a little more forthcoming about how they achieve so much setup with so little code. By default, the SDK will make use of a technique known as Method Swizzling. There’s a great NSHipster article by @Mattt that delves into the details for those interested, but the gist is that you can remap methods that already exist in an object to call a different method instead. If that sounds like hot-wiring a car, that’s because you basically are. It’s a benefit (or flaw, depending on your point of view) of Objective-C’s message/method paradigm that allows this to happen.
In the case of Firebase, it basically creates a new app delegate and forwards or proxies messages to your app
delegate, inserting itself into the structure of your app. While this simplifies configuration, it also allows the
SDK to intercept all app lifecycle events and do what it wants to with the data. This may be fine for some apps, but
others may wish to exert more control over this process. You can do this by defining a boolean flag in your app’s
Info.plist file called FirebaseAppDelegateProxyEnabled. By setting this value to NO, you regain control over your
app delegate, but you will need to provide some data to Firebase that would otherwise be added automatically. The
main one (which the documentation actually outlines) is that when the user agrees to push notifications, you need to pass their device token to Firebase so it can store it on the backend create its own token to pass to your server.
func application(application: UIApplication,
                 didRegisterForRemoteNotificationsWithDeviceToken deviceToken: NSData) {
  Messaging.messaging().apnsToken = deviceToken
}
Luckily it’s straightforward. I usually prefer to implement this method myself and disable the proxy delegate; the benefit is that you’re given more transparency of knowing what’s happening at every level of the app. Your mileage may vary, and there’s certainly nothing inherently wrong in using the proxy method.
I hope that this has granted you a little more understanding of how the simplicity of integrating an SDK like Firebase is achieved and what it means for your iOS app structure.
Be sure to check out other great work from Chris:
- The Most Common Issues I’ve Caught Reviewing iOS Apps
- Versioning for iOS and Android Apps - Part 1
- Versioning for iOS and Android Apps - Part 2
- The Most Common Issues I’ve Caught Reviewing Swift
- Top 3 Security Vulnerabilities I Find in iOS and Android Projects
- Tips for Screening Developers for a Remote Position
