About the author
Telmo Goncalves is a software engineer with over 13 years of software development experience and an expert in React. He’s currently Engineering Team Lead at Marley Spoon.
Check out more of his work on telmo.is and follow him on Twitter @telmo
This article expands on Authentication with NextJS and Supabase. It covers how to allow users to log in with their mobile phone using Twilio. Phone authentication is also very commonly used as a two-factor authentication (2FA); it’s very commonly used in consumer applications for user security. No experience with Twilio is required, but if you’re new to software development I strongly encourage working through this exercise first.
We’ll be building on the same repository for implementing SMS OTP (one-time password), so make sure to use the same code as a foundation.
What this covers:
- Creating and setting up a Twilio account. There’s no cost required for this tutorial.
- Setting up Supabase with Twilio credentials.
- Implementing login functionality with phone number.
Twilio
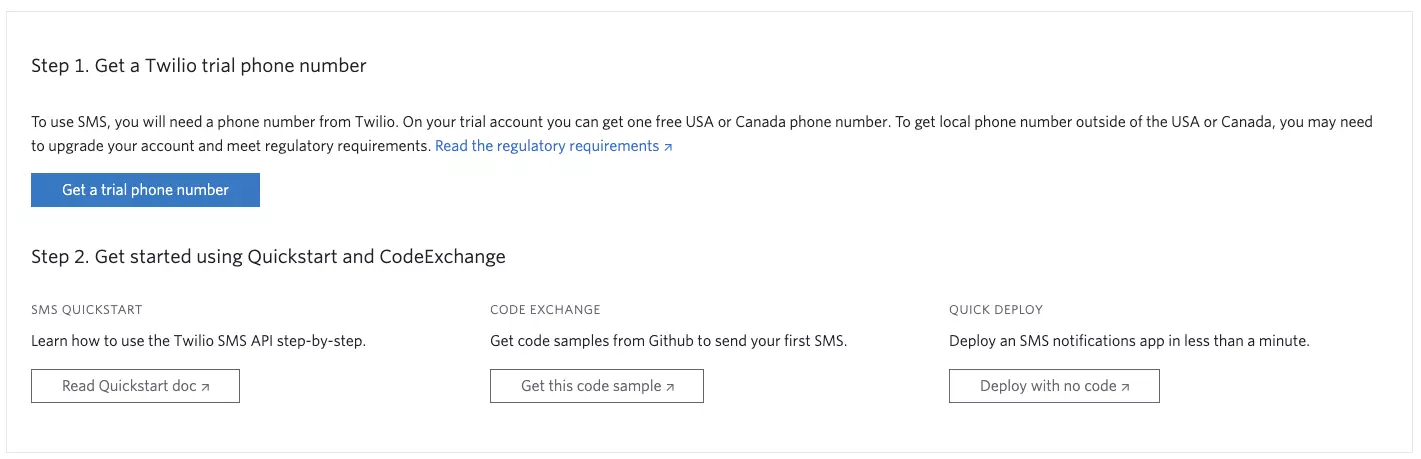
Navigate to Twilio and create an account. Once you’re done setting up everything you’ll need to request a trial phone number, scroll down and click on Get a trial phone number:
You should see a messaging reading something like:
Your new Phone Number is +13345∙∙∙∙∙∙
The format of the phone number may vary depending on your region.
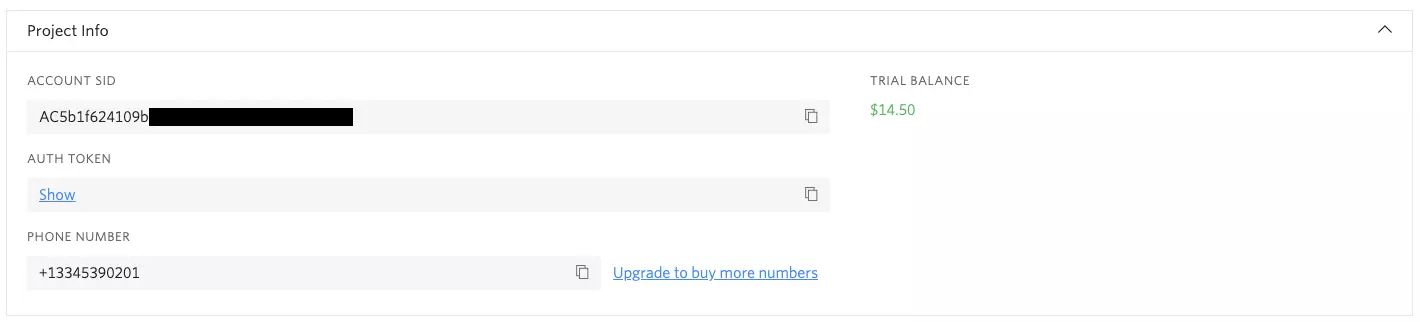
You should now see the credentials we’ll be using over at Supabase:
Supabase
Access your Supabase account, navigate to Settings → Auth settings, under Phone Auth toggle Enable Phone Signup.
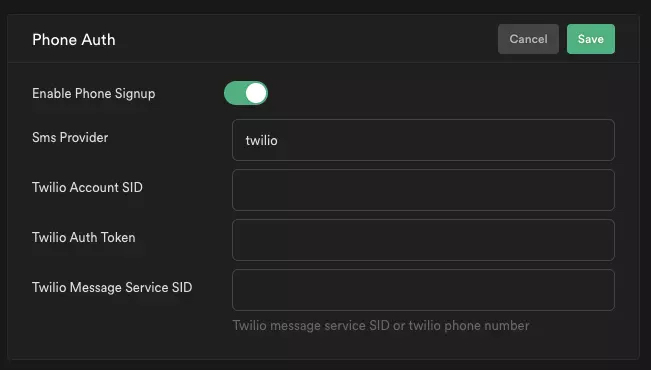
Fill in the details with Twilio credentials accordingly. Click on Save.
The Application
Now the existing application can be updated to add the ability to sign up either with email or with a phone number.
Open pages/auth.tsx - the file should look like this:
import { useState } from 'react'
import { useRouter } from 'next/router'

import supabase from '../lib/supabase'

const Auth: React.FC = () => {
  const [email, setEmail] = useState<string>()
  const { push } = useRouter()

  const handleSubmit = async (e: React.FormEvent) => {
    e.preventDefault()

    const { error } = await supabase.auth.signIn({ email })

    if (!error) push('/')
  }

  return (
    <div className="border rounded-lg p-12 w-4/12 mx-auto my-48">
      <h3 className="font-extrabold text-3xl">Ahoy!</h3>

      <p className="text-gray-500 text-sm mt-4">
        Fill in your email, we'll send you a magic link.
      </p>

      <form onSubmit={handleSubmit}>
        <input
          type="email"
          placeholder="Your email address"
          className="border w-full p-3 rounded-lg mt-4 focus:border-indigo-500"
          onChange={e => setEmail(e.target.value)}
        />

        <button
          type="submit"
          className="bg-indigo-500 text-white w-full p-3 rounded-lg mt-8 hover:bg-indigo-700"
        >
          Let's go!
        </button>
      </form>
    </div>
  )
}

export default Auth
First, we’ll need to add 2 new states:
- One to save the phone number value.
- One to toggle between email and phone number as the signup method.
import { useState } from 'react'
import { useRouter } from 'next/router'

import supabase from '../lib/supabase'

const Auth: React.FC = () => {
  const [email, setEmail] = useState<string>()
  const [phone, setPhone] = useState<string>()
  const [signupWithPhone, setSignupWithPhone] = useState(false)
  const { push } = useRouter()

  // ...
}

export default Auth
With the new states added, we’ll need to add a new <input> for the user’s phone number:
<form onSubmit={handleSubmit}>
  <input
    type="text"
    placeholder="Your phone number"
    className="border w-full p-3 rounded-lg mt-4 focus:border-indigo-500"
    onChange={e => setPhone(e.target.value)}
  />

  <input
    type="email"
    placeholder="Your email address"
    className="border w-full p-3 rounded-lg mt-4 focus:border-indigo-500"
    onChange={e => setEmail(e.target.value)}
  />

  <button
    type="submit"
    className="bg-indigo-500 text-white w-full p-3 rounded-lg mt-8 hover:bg-indigo-700"
  >
    Let's go!
  </button>
</form>
At this point, both the email and phone number inputs will be visible at the same time. This can be confusing since
the user may think that they’ll need to provide both. We should make it clear to the user that either option can be
used (not both), so we’ll need to display the input depending on the value of signupWithPhone.
To do that, add the following:
<form onSubmit={handleSubmit}>
  {signupWithPhone ? (
    <input
      type="text"
      placeholder="Your phone number"
      className="border w-full p-3 rounded-lg mt-4 focus:border-indigo-500"
      onChange={e => setPhone(e.target.value)}
    />
  ) : (
    <input
      type="email"
      placeholder="Your email address"
      className="border w-full p-3 rounded-lg mt-4 focus:border-indigo-500"
      onChange={e => setEmail(e.target.value)}
    />
  )}

  <button
    type="submit"
    className="bg-indigo-500 text-white w-full p-3 rounded-lg mt-8 hover:bg-indigo-700"
  >
    Let's go!
  </button>
</form>
Now we just need to create a button to allow the user to switch between the 2 input options:
<form onSubmit={handleSubmit}>
  {/* ... */}

  <div className="my-4">
    <button
      className="text-sm text-gray-500 hover:underline"
      onClick={() => setSignupWithPhone(!signupWithPhone)}
    >
      Use {signupWithPhone ? 'email' : 'phone'} instead
    </button>
  </div>

  <button
    type="submit"
    className="bg-indigo-500 text-white w-full p-3 rounded-lg mt-8 hover:bg-indigo-700"
  >
    Let's go!
  </button>
</form>
This will allow the user to select email or phone as the signup option. Every time the button is clicked, it
will set the value of signupWithPhone to the opposite value.
The way booleans work with this technique:
let signupWithPhone = true;

!signupWithPhone; // false
!signupWithPhone; // true
!signupWithPhone; // false
!signupWithPhone; // true
So a different context will be displayed depending if signupWithPhone is true (sign up with phone) or false
(sign up with email).
Awesome, we’ll need to make a small update to the handleSubmit function:
const handleSubmit = async (e: React.FormEvent) => {
  e.preventDefault()

  const { error } = await supabase.auth.signIn({
    ...signupWithPhone ? { phone } : { email },
  })

  if (!error) push('/')
}
This is a cool trick. Since Supabase uses the same signIn() for both email and phone, we can simply check if the
signup is being initialized using the phone option, otherwise we’re sending the value of email. Voilà!
OTP Code
OTP authentication via phone uses a verification code to ensure the phone number is valid. So the application needs a way of verifying that the code sent to their device is valid. So we’ll need to update where the user is directed when they initiate a signup using their phone.
For the sake of code cleanliness, it’s best to create a new, dedicated component for this:
touch pages/verify-otp.tsx
Inside the file, create a simple component:
const VerifyOTP: React.FC = () => {
  return (
    <>
      We'll verify OTP here!
    </>
  )
}

export default VerifyOTP
Great, now we need to make a small change on our pages/auth.tsx component:
const handleSubmit = async (e: React.FormEvent) => {
  e.preventDefault()

  const { error } = await supabase.auth.signIn({
    ...signupWithPhone ? { phone } : { email },
  })

  if (!error) push(signupWithPhone ? '/verify-otp' : '/')
}
Now when authenticating with phone we’ll redirect the user to verify the OTP code.
Back in VerifyOTP, we’ll create the input where the user can enter their verification code:
const VerifyOTP: React.FC = () => {
  return (
    <div className="border rounded-lg p-12 w-4/12 mx-auto my-48">
      <h3 className="font-extrabold text-3xl">Verify OTP</h3>

      <p className="text-gray-500 text-sm mt-4">
        You should've received an SMS with a code.
      </p>

      <form>
        <input
          type="token"
          placeholder="Your OTP code"
          className="border w-full p-3 rounded-lg mt-4 focus:border-indigo-500"
        />

        <button
          type="submit"
          className="bg-indigo-500 text-white w-full p-3 rounded-lg mt-8 hover:bg-indigo-700"
        >
          Verify
        </button>
      </form>
    </div>
  )
}

export default VerifyOTP
Now we need to save the value of our input and handle the form submission:
import { useState } from 'react'
import { useRouter } from 'next/router'

import supabase from '../lib/supabase'

const VerifyOTP: React.FC = () => {
  const [token, setToken] = useState<string>('')
  const phone = 'YOUR_PHONE_NUMBER'
  const { push } = useRouter()

  const handleSubmit = async (e: React.FormEvent) => {
    e.preventDefault()

    const { session, error } = await supabase.auth.verifyOTP({ phone, token })

    console.log({ session })

    if (!error) push('/')
  }

  return (
    <div className="border rounded-lg p-12 w-4/12 mx-auto my-48">
      <h3 className="font-extrabold text-3xl">Verify OTP</h3>

      <p className="text-gray-500 text-sm mt-4">
        You should've received an SMS with a code.
      </p>

      <form onSubmit={handleSubmit}>
        <input
          type="token"
          placeholder="Your OTP code"
          className="border w-full p-3 rounded-lg mt-4 focus:border-indigo-500"
          onChange={e => setToken(e.target.value)}
        />

        <button
          type="submit"
          className="bg-indigo-500 text-white w-full p-3 rounded-lg mt-8 hover:bg-indigo-700"
        >
          Verify
        </button>
      </form>
    </div>
  )
}

export default VerifyOTP
You might notice that I’m setting the phone number as a raw value, there are several ways this can be handled, I
don’t want to go through any because it’s not the point of this article, but you could save the value of the phone
number with localStorage, or have all this logic in one single component.
That’s it! Everything should be working as expected. Go through the whole flow and you should get a session object back from Supabase.
Telmo regularly posts helpful React development tips and guides on Twitter. Be sure to follow him at @telmo