About the author
Chris Griffith has been a game developer for over 19 years and a mobile developer since 2010. He’s produced dozens of apps and games for brands like Match.com, LEGO, Microsoft, Kraft, Anheuser-Busch and PepsiCo.
Chris has been a member of the PullRequest network since April 2018.
Be sure to check out other great work from Chris:
- Versioning for iOS and Android Apps - Part 1
- The Most Common Issues I’ve Caught Reviewing Swift
- The Most Common Issues I’ve Caught Reviewing iOS Apps
- Top 3 Security Vulnerabilities I Find in iOS and Android Projects
This is the second part of an exploration of version numbers in mobile apps. Part 1 discussed a standardized system for consistently and clearly versioning your apps. In this part, we’ll look at the technical aspects of making sure versions are applied correctly with as little headache as possible.
For the main version number presented in the store, there is no magic bullet for automatically incrementing it. This has to be done manually by whatever rules you or your team determine. However, there are a couple of things we can do to surface this version in the UI. All these examples are written in Swift and Kotlin, but there’s nothing here that can’t be done in Java or Objective-C.
Displaying the Version on iOS
To access an iOS app’s version number, you have to access a property that is part of the Info.plist file, which is made
accessible via the Bundle class. In Swift, this is written as:
Bundle.main.infoDictionary?["CFBundleShortVersionString"]
However, as properties go, this is not ideal. This identifier is easy to forget. Also, it’s never going to not have a value in a valid app, so having to unwrap the optional dictionary AND the optional value from the key is boilerplate it would be nice to avoid. Enter extensions…
extension Bundle {
  var version: String {
    return Bundle.main.infoDictionary?["CFBundleShortVersionString"] ?? ""
  }
}

// In practice
Bundle.main.version
Much better! Now, anywhere the app we need it, we have nice, clean syntax. We can also do this with the build number,
which idiosyncratically has the name: CFBundleVersion.
extension Bundle {
  var build: String {
    return Bundle.main.infoDictionary?["CFBundleVersion"] ?? ""
  }
}

// In practice
Bundle.main.build
These can now be inserted into any label to make them accessible to your users. We can go one further and combine them into an interpolated string for consistency.
extension Bundle {
  var formattedVersion: String {
    return "v\(version) (\(build))" // Ex. "v4.10.1 (150)"
  }
}
On iOS, we can also go the extra step of adding the version to a Settings bundle. I won’t go into the details of
creating a Settings bundle - there are plenty of tutorials for that elsewhere. In case a user cannot launch your app for
some reason, it’s nice to allow them to get the version number from within the Settings app. Creating an item to house
the version number is very simple - just use a Title object and assign it a unique identifier.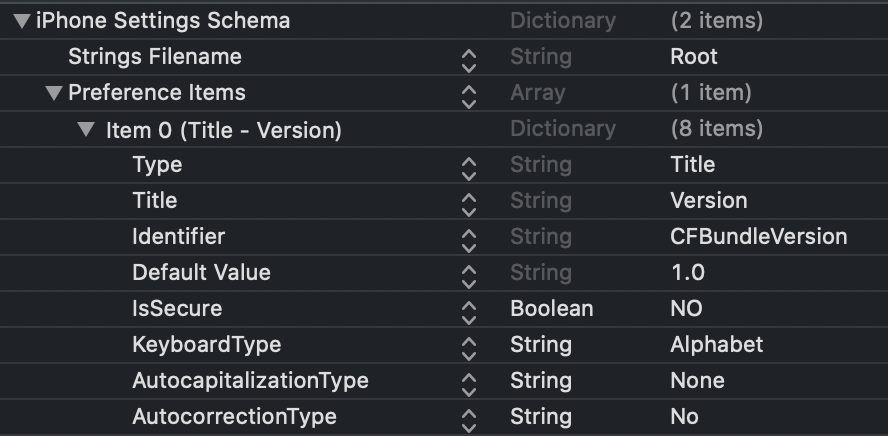
At this point you may be thinking, “But this is a static field? Do I have to manually update this bundle whenever I update the app version?” Well, you could but that would be tedious and prone to forgetting. Instead, we’ll create a build script that makes sure the Settings bundle uses the same version as the app.
In the Project editor, select the Build Phases tab and add a new Run Script phase at the end of the list. The follow code is a bash script. You might need to slightly alter the paths for your project. Also, if you have more items in your Settings bundle and the version is not the first, make sure you change the index from the last line from 0 to the proper index.
#!/bin/bash
settings_plist="${TARGET_BUILD_DIR}/${PRODUCT_NAME}.app/Settings.bundle/Root.plist"
CFBundleShortVersionString=`/usr/libexec/PlistBuddy -c "Print :CFBundleShortVersionString" "${TARGET_BUILD_DIR}/${PRODUCT_NAME}.app/Info.plist"`
CFBundleVersion=`/usr/libexec/PlistBuddy -c "Print :CFBundleVersion" "${TARGET_BUILD_DIR}/${PRODUCT_NAME}.app/Info.plist"`
/usr/libexec/PlistBuddy -c "Set :PreferenceSpecifiers:0:DefaultValue '${CFBundleShortVersionString} (${CFBundleVersion})'" "$settings_plist"
This will take the values from the Info.plist file and replace the default value in the bundle. Easy peasy. You won’t
have to think about it again.
Displaying the Version on Android
There’s no concept of a Settings bundle on Android, but on many versions of the OS you can go to the app’s page in the Settings app and it will render the version for you at the bottom of the screen. Let’s look at how we access the app’s version number in code. Note that the technique we’re using below only works if you have a Gradle-based application. If you’re using a legacy build system, there are how-to’s out there that have you covered.
// At the top of the file
import com.yourpackage.BuildConfig

val versionCode: Int = BuildConfig.VERSION_CODE
val versionName: String = BuildConfig.VERSION_NAME
A formatted version can be added like we did on iOS. We can’t extend BuildConfig, but this could be part of any common
utils package or made available on the Application via a companion object.
fun formattedVersion(): String {
  return "v${BuildConfig.VERSION_NAME} (${BuildConfig.VERSION_CODE})"
}
Leveraging Source Control for Build Numbers and Version Codes
Up to this point, I’ve not made any assumptions about the development environment of an app. If you’re just editing a project on your local machine, these techniques should work just fine. However, if like most people you’re using source control (and I recommend you do!), there’s another option available to us for automating this process further.
We can use the revision count of our repository to assign our build number (iOS) and version code (Android). This has a few benefits:
- Every commit is a snapshot of a repository - making a build from a commit will produce a unique build number that represents the code in that state.
- If you have multiple build configurations, you can synchronize the build numbers across branches. For intsance, it’s not uncommon for a development team to have 2 development environments + production. In this case, a CI system will likely build three different branches, one for each. As changes are tested and approved, they will be rolled to each subsequent branch and all the version numbers will sync. Someone in QA reviewing build 330 in Staging and build 330 in Sandbox will know the codebase is the same.
- It’s ever-incrementing and you don’t have to think about it once it’s in place.
To set this up will require a few more scripts. In this example I’ll use git (which tends to be the most common), but it’s likely these techniques could be applied to Mercurial, SVN, or other SCM systems with different syntax.
We’ll look at iOS first, then Android.
On iOS, we’ll want to create another Run Script build phase, making sure to execute this one before the one copying the value to the Settings bundle.
git=$(sh /etc/profile; which git)
number_of_commits=$("$git" rev-list HEAD --count)
git_release_version=$("$git" describe --tags --always --abbrev=0)
target_plist="$TARGET_BUILD_DIR/$INFOPLIST_PATH"
dsym_plist="$DWARF_DSYM_FOLDER_PATH/$DWARF_DSYM_FILE_NAME/Contents/Info.plist"
echo $number_of_commits
for plist in "$target_plist" "$dsym_plist"; do
if [ -f "$plist" ]; then
/usr/libexec/PlistBuddy -c "Set :CFBundleVersion $number_of_commits" "$plist"
fi
This script stamps the build number in the Info.plist file as well as any debug symbols, so they will all match once the
build is complete. Note that this only applies to the build after it’s been compiled. The original Info.plist file
remains untouched - I always just set the value to 1 there, since it will be replaced anyway.
On Android, we’ll create a Gradle file and use a third-party library to access the same git information:
buildscript {
    repositories {
        jcenter()
    }
    dependencies {
        classpath 'org.ajoberstar:grgit:2.1.1'
    }
}

import org.ajoberstar.grgit.Grgit

ext {
    git = Grgit.open(currentDir: projectDir)
    gitVersionCode = git.log().size()
    gitVersionCodeTime = git.head().time
}

task printVersion() {
    println("Version Code: $gitVersionCode")
    println("Version Code Time: $gitVersionCodeTime")
}
This will ultimately do the same thing as the iOS bash script, getting the commit count and setting it to a version code. In the main Gradle build file for the application, you’ll just need to add this:
// At the top of the file, apply the name of the gradle version file
apply from: "$project.rootDir/script-git-version.gradle"

// Then, inside the defaultConfig:
versionCode gitVersionCode
versionName "1.0.8" // Manually enter your version # here
If you’re developing on both platforms simultaneously, your iOS and Android apps can have matching version numbers representative of their feature sets, but the build and version codes will be representative of their git histories.
This system is not without its flaws. It’s possible to create two different feature branches, make an identical number of commits to each, and then build - resulting in two different builds with the same version and build numbers. However, this only really matters when you deploy to TestFlight or Google Play’s beta track. For what it’s worth, I’ve had teams of multiple developers working in different feature branches and it never caused a problem when deploying builds since the practice was to always merge back to a main branch when building.
Conclusion
This isn’t the definitive way to approach app versioning, this is just one approach. Do what works for your apps and your process. The important thing is to have a system and to apply real meaning and intention to your version numbers. Instead of seeing versioning as a necessary evil, see it as an opportunity to convey information to your end users, your fellow developers, and even yourself.
Be sure to check out other great work from Chris:
- Versioning for iOS and Android Apps - Part 1
- The Most Common Issues I’ve Caught Reviewing Swift
- The Most Common Issues I’ve Caught Reviewing iOS Apps
- Top 3 Security Vulnerabilities I Find in iOS and Android Projects
Photo by WolfVision GmbH with sizing modification.
