About the author
@catalinmpit is a software engineer, AWS community builder and technical writer based out of London. He’s currently an engineer at TypingDNA, working on applying keystroke dynamics as a means of biometrics authentication.
Check out more of his work on catalins.tech

Lazy Loading, if you’re not already familiar with the term, here’s what it means: lazy loading is a technique you can use to delay loading non-critical resources in your application.
“Why would I ever want to do that?” you may ask. The answer is just as simple as the given definition. It will help you reduce load times and consume less data/system resources.
In a nutshell, it can increase the performance of your app.
DIY, the Modern Way
Lazy loading can be applied to many scenarios. The most common use encountered across websites is focused on images and videos. This article highlights a use case for the former (loading images) which is more common.
Imagine you run a local business where you sell cookies. Your company has a landing page with about 10 products, but as the business grows you keep adding more. You gradually see how the page is starting to slow down. Oh no!
For the boilerplate of this exercise, use this snippet.
The snippet in the link above is your cookie business landing page. Let’s test it and see how fast it currently loads on a slower connection.
To do that, head to Network from Developer Tools. Click Disable cache and select Fast 3G from the dropdown. Now reload the page by pressing CTRL + R.
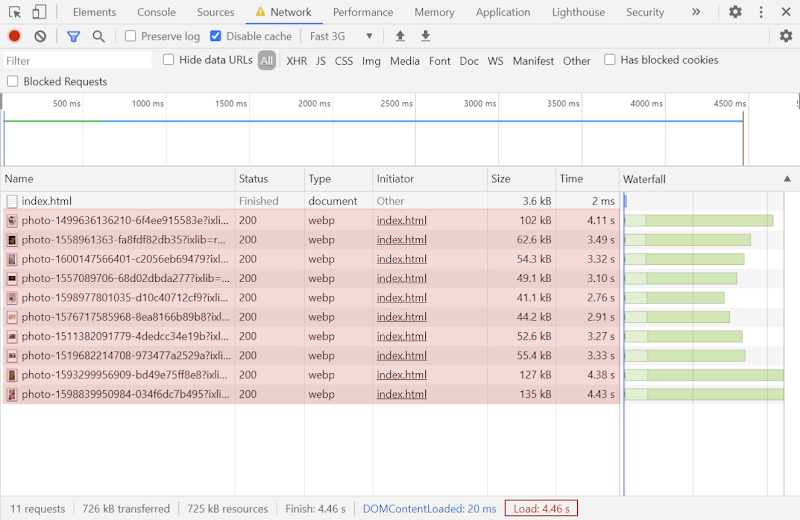
On a local machine, the page takes a whopping 4.46 seconds to load. That’s a lot. No worries though, we’re going to fix that. Having our comparison baseline set, let’s dive into the code.
Here’s how we can optimize page loading time:
Prevent the browser from downloading the images at once
A simple way to do this is by holding the original images in data attributes on the given img tags. This will
prevent the browser from downloading the assets and let us manipulate them later on.
<img
class="cookie" data-src="https://images.unsplash.com/photo-1499636136210-6f4ee915583e?ixlib=rb-1.2.1&ixid=eyJhcHBfaWQiOjEyMDd9&auto=format&fit=crop&w=500&q=65"
/>
Make it easy to identify all the images which need to be lazy-loaded
Add a class such as lazyload to the desired images. It should look like this:
<img
class="cookie lazyload"
data-src="https://images.unsplash.com/photo-1499636136210-6f4ee915583e?ixlib=rb-1.2.1&ixid=eyJhcHBfaWQiOjEyMDd9&auto=format&fit=crop&w=500&q=65"
/>
Consider adding a visual fallback until the original image loads
A nice way to provide feedback to your visitors is by placing a small image as the source. Images with about 5 pixels in width/height will do the job. Alternatively, you can use a spinning gif. If the lazy-load fails or takes longer to execute, you will not be left with a blank page.
<img
class="cookie lazyload" src="https://images.unsplash.com/photo-1499636136210-6f4ee915583e?ixlib=rb-1.2.1&ixid=eyJhcHBfaWQiOjEyMDd9&auto=format&fit=crop&w=5&q=1"
data-src="https://images.unsplash.com/photo-1499636136210-6f4ee915583e?ixlib=rb-1.2.1&ixid=eyJhcHBfaWQiOjEyMDd9&auto=format&fit=crop&w=500&q=65"
/>
Create the logic to load a single image
Moving to JS, create a function that takes an image as a parameter. Its purpose is to move data-src to src and change the class from lazyload to lazyloaded. By changing the class it will be easy to, later on, detect whether the images have been lazy-loaded or not (if needed).
const loadImage = (image) => {
  if(!image) {
    return;
  }

  const { src } = image.dataset;
  image.src = src;
  image.classList.remove('lazyload');
  image.classList.add('lazyloaded');
}
Test your code
Gather the images, loop through them and try to apply your newly created logic.
const images = document.querySelectorAll('img.lazyload');
images.forEach((image) => loadImage(image));
Refresh. All the original images should now be visible on the page. Moving forward, remove the loadImage loop as it is no longer needed.
Observing the images and lazy-loading
The most important part comes in. Create an intersection observer and let it do the work for you. If you don’t know what intersection observers are or how they work, check this resource. More details below.
const images = document.querySelectorAll('img.lazyload');
images.forEach((image) => loadImage(image));
// Detect if intersection observers are available
if ("IntersectionObserver" in window) {
  // Create the observer instance
  const lazyObserver = new IntersectionObserver((entries, observer) => {
    // entries = all of the previously targeted images
    // Check whether each entry (image) is currently in the view
    entries.forEach((entry) => {
      if (entry.isIntersecting) {
        // Current image is in the view so load the image
        loadImage(entry.target);
        // Remove it from observer’s list as we no longer need to track it
        lazyObserver.unobserve(entry.target);
      }
    });
  });
  // Loop through the images and add each to the observer’s list
  images.forEach((image) => lazyObserver.observe(image));
}
On page load, the script will get the images and add them to an intersection observer. What this does is constantly check if an image is in the viewport or not.
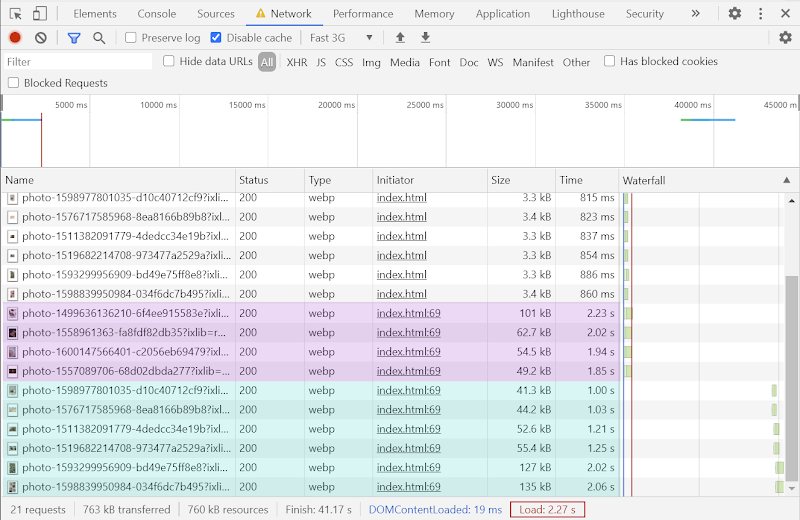
If some of the images are already in the view at page load, it will instantly trigger the load of those. For the images lower on the page, when scrolling, once they intersect with the viewport of the browser, the load happens once again.
This process occurs a single time for each image. After the load is being done, the script removes the image from the observation list.
That’s it. You now have a functional image lazyloader! For the full code, you can find a demo snippet here.
Before moving any further, let’s test page’s load time once again.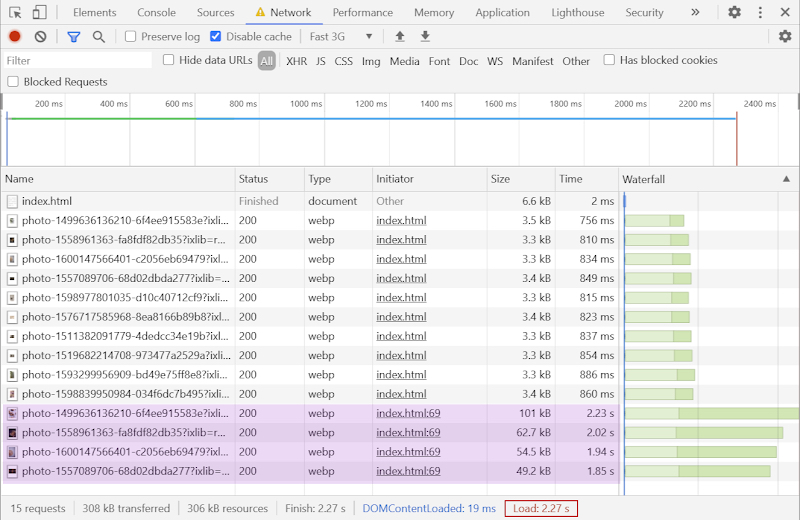
2.27 seconds! That’s half the load time without lazy-loading in place. When scrolling, you’ll also see the rest of the assets downloading.
Now that you know the magic behind the process, I will show you some easy ways to add lazy-loading to your website without implementing it from scratch.
Native Support
For modern browsers, there already exists an implementation of a native lazy-loading behaviour. All you have to do is to add the loading attribute to your image tags.
<img src="my-cookie.png" alt="Chocolate cookie" loading="lazy"/>
You may think, “That’s perfect!” But unfortunately, at the time of writing, it has limited support across browsers. So you might want to reconsider using it in production.
Lazy Loading Libraries
As of writing, one of the most convenient way to handle is by using a library such as lazysizes or vanilla-lazyload.
These libraries come with great browser support, you will see them being used even on the enterprise level and the integration process is simple… as simple as importing a library and adding a class to your image tags.
WordPress
“But my website is built with WordPress, I have no access to the code!“ No worries, there are plugins that can help you with that. You can look into Lazyload by WPRocket.
That’s a wrap! I hope this guide was useful in understanding the benefits of lazy-loading and how to apply it.
Catalin regularly posts helpful development tips and guides on Twitter. Be sure to follow him at @catalinmpit
Image by Daniel Aleksandersen