About the author
Telmo Goncalves is a software engineer with over 13 years of software development experience and an expert in React. He’s currently Engineering Team Lead at Marley Spoon.
Check out more of his work on telmo.is and follow him on Twitter @telmo

This article will show you how to build a NextJS application and implement authentication, along with some other resources, using Supabase.
NextJS is an open-source framework built on top of Node.js. It’s relatively new, but it’s been quickly adopted. It has some great features like built-in CSS and out-of-the-box support for server side rendering (SSR) of React components.
Supabase is commonly referred to as an open-source alternative to Firebase. It’s a PostgreSQL database that provides an instant RESTful API and real-time capabilities using websockets. It also provides authentication with row-level security (RLS).
Let’s get started ⬇️
To initialize a NextJS application, first run:
npx create-next-app --ts
In case you’re wondering --ts means we’ll be using TypeScript.
You may see this message:
Need to install the following packages:
  create-next-app
Ok to proceed? (y)
If so, just press enter (↵).
Then you should be shown a prompt to provide a name for the application, either use the default name (my-app) or
enter whatever name you want.
? What is your project named? › my-app
Now open the application’s folder and run npm run dev, NextJS should be ready to be used. Open localhost:3000 in a browser window. You should see something like this:

TailwindCSS
Next we’ll install TailwindCSS to style the login screen and make it look great. To do that, run:
npm install -D tailwindcss@latest postcss@latest autoprefixer@latest
Once the packages have finished installing, run the following command to create the configuration files:
npx tailwindcss init -p
Now open styles/globals.css and replace any existing code with:
@tailwind base;
@tailwind components;
@tailwind utilities;
If you want a more in-depth tutorial on how to use TailwindCSS with NextJS check out this article.
Awesome, next we’ll remove of some of the boilerplate that comes with create-next-app.
Getting rid of boilerplate
First navigate to /pages/index.tsx and replace all that code with:
const Homepage: React.FC = () => {
  return <>Homepage</>
}

export default Homepage
You can also delete the following:
- pages/api (folder)
- styles/Home.module.css (file)
Supabase
Now we can install Supabase and build an auth page. First, you’ll need to create a Supabase account. Navigate to their page and click on Start your project, you’ll need to use your GitHub account to create an account.
Click on New project and fill in the details. It should take a few minutes to setup everything, after that you’ll be provided a unique URL for your project and a unique key as well.
Alright, we can go ahead and install Supabase:
npm install --save @supabase/supabase-js
I usually like to create a lib folder to keep these services all in one place, let’s do that:
mkdir lib && touch lib/supabase.ts
Inside supabase.ts put the following code:
import { createClient } from '@supabase/supabase-js'

const supabaseUrl = '<YOUR_PROJECT_URL>'
const supabaseKey = '<YOUR_SUPABASE_KEY>'
const supabase = createClient(supabaseUrl, supabaseKey)

export default supabase
Make sure you don’t commit the Supabase key to a source control repository. It’s best practice to use environment variables to prevent the key from getting compromised.
Now you should be able to connect to your Supabase project. Let’s build an auth page.
Authentication
To keep this simple, we’ll be using a passwordless authentication approach. We’ll use Magic Link which Supabase provides out-of-the-box.
Run:
touch pages/auth.tsx
Inside auth.tsx add a simple component just to confirm it’s working.
const Auth: React.FC = () => {
  return (
    <>
      Our auth page will be here!
    </>
  )
}

export default Auth
Update index.tsx to include a link for the new auth page:
import Link from 'next/link'

const Homepage: React.FC = () => {
  return (
    <>
      <Link href="/auth">Log In Now!</Link>
    </>
  )
}

export default Homepage
Now if you run the application you should be able to navigate from the homepage to the newly created auth page.
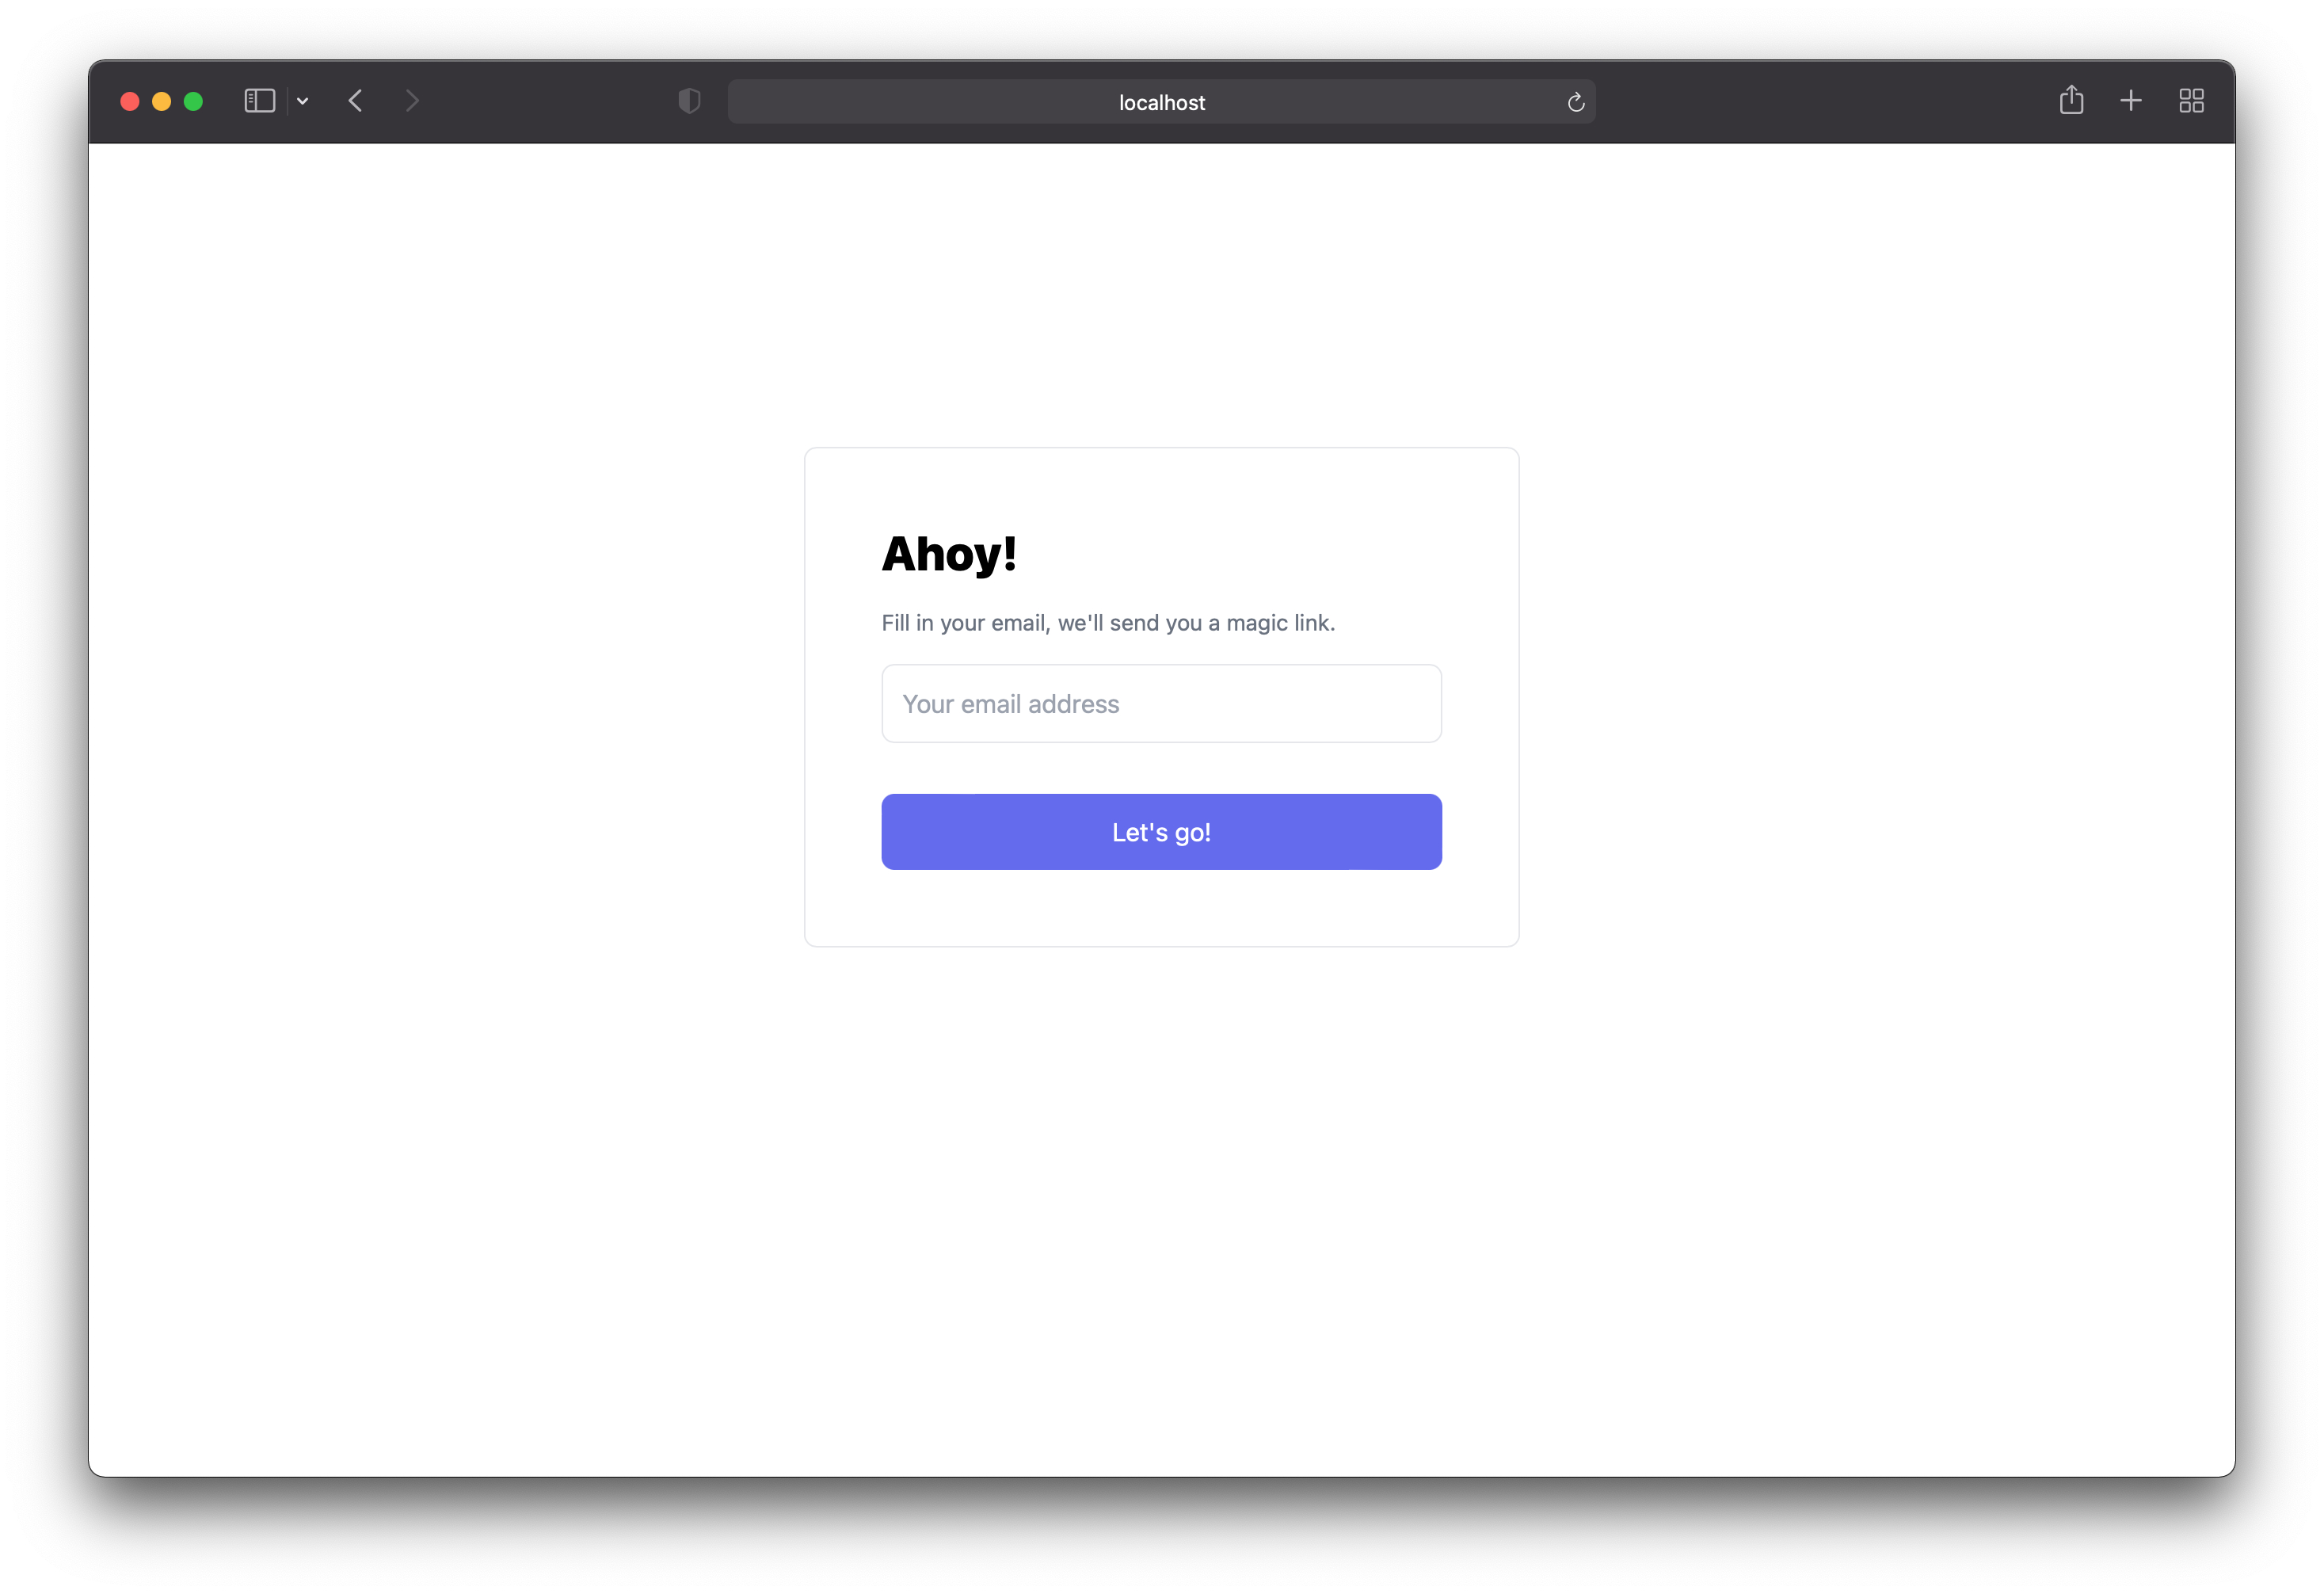
Now let’s style the auth page a bit. Replace all existing code with the following:
const Auth: React.FC = () => {
  return (
    <div className="border rounded-lg p-12 w-4/12 mx-auto my-48">
      <h3 className="font-extrabold text-3xl">Ahoy!</h3>

      <p className="text-gray-500 text-sm mt-4">
        Fill in your email, we'll send you a magic link.
      </p>

      <form>
        <input
          type="email"
          placeholder="Your email address"
          className="border w-full p-3 rounded-lg mt-4 focus:border-indigo-500"
        />

        <button
          type="submit"
          className="bg-indigo-500 text-white w-full p-3 rounded-lg mt-8 hover:bg-indigo-700"
        >
          Let's go!
        </button>
      </form>
    </div>
  )
}

export default Auth
Now the login component should look like this:
Now we need to handle the actual login functionality. Supabase makes this very easy. First we’ll need to update the
auth component. We’ll need to import Supabase from /lib:
import supabase from '../lib/supabase'

const Auth: React.FC = () => {
  return (
    // ...
  )
}

export default Auth
We’ll need a way to save email addresses that users provide. This can be done using React Hooks:
import { useState } from 'react'

import supabase from '../lib/supabase'

const Auth: React.FC = () => {
  const [email, setEmail] = useState<string>()

  return (
    // ...
  )
}

export default Auth
Next we need to trigger an onChange event on the input:
<input
  type="email"
  placeholder="Your email address"
  className="border w-full p-3 rounded-lg mt-4 focus:border-indigo-500"
  onChange={e => setEmail(e.target.value)}
/>
Then we need to add handling for when the form is submitted:
// ...

const Auth: React.FC = () => {
  return (
    <div className="border rounded-lg p-12 w-4/12 mx-auto my-48">
      <h3 className="font-extrabold text-3xl">Ahoy!</h3>

      <p className="text-gray-500 text-sm mt-4">
        Fill in your email, we'll send you a magic link.
      </p>

      <form onSubmit={handleSubmit}>
        <input
          type="email"
          placeholder="Your email address"
          className="border w-full p-3 rounded-lg mt-4 focus:border-indigo-500"
        />

        <button
          type="submit"
          className="bg-indigo-500 text-white w-full p-3 rounded-lg mt-8 hover:bg-indigo-700"
        >
          Let's go!
        </button>
      </form>
    </div>
  )
}

export default Auth
Great! Now let’s create the handleSubmit function and debug it a little bit to make sure it’s receiving what we’re
expecting:
// ...

const Auth: React.FC = () => {
  const handleSubmit = async (e: React.FormEvent) => {
    e.preventDefault()

    const { error } = await supabase.auth.signIn({ email })

    console.log({ error })
  }

  return (
    // ...
  )
}

export default Auth
If the error is null it means everything worked. You should receive an email notification from Supabase. Clicking
the link from the message should automatically authenticate your user. Let’s make sure you’re authenticated by
fetching
your user and debugging it.
The user
First, update the auth component to redirect to the homepage in the event authentication is successful:
import { useRouter } from 'next/router'

const Auth: React.FC = () => {
  const [email, setEmail] = useState<string>()
  const { push } = useRouter()

  const handleSubmit = async (e: React.FormEvent) => {
    e.preventDefault()

    const { error } = await supabase.auth.signIn({ email })

    if (!error) push('/')
  }

  return (
    // ...
  )
}

export default Auth
And add a few changes to fetch the user on the homepage component:
import Link from 'next/link'

import supabase from '../lib/supabase'

const Homepage: React.FC = () => {
  const user = supabase.auth.user()

  return (
    <>
      <Link href="/auth">Log In Now!</Link>

      <pre>
        <code>
          {JSON.stringify(user, null, 2)}
        </code>
      </pre>
    </>
  )
}

export default Homepage
Now try logging in with your email address. Check your inbox and click the link. When your application opens, you should see an object of your authenticated user. It should look similar to this:
{
  "id": "59b05yef-1213-4c53-8ef9-8eb4b50d1u75",
  "aud": "authenticated",
  "role": "authenticated",
  "email": "telmo@hey.com",
  "email_confirmed_at": "2021-07-30T09:50:09.219595Z",
  "phone": "",
  "confirmation_sent_at": "2021-07-30T09:43:26.799986Z",
  "confirmed_at": "2021-07-30T09:50:09.219595Z",
  "recovery_sent_at": "2021-08-02T07:36:19.879576Z",
  "last_sign_in_at": "2021-08-02T07:36:31.757178Z",
  "app_metadata": {
    "provider": "email"
  },
  "user_metadata": {},
  "created_at": "2021-07-30T09:43:26.796244Z",
  "updated_at": "2021-07-30T09:43:26.796244Z"
}
Voilà! You can find the full code on this repository.
Telmo regularly posts helpful React development tips and guides on Twitter. Be sure to follow him at @telmo